Tuesday, August 6, 2019

Reading and Writing Handbook

Papers can quickly become overwhelming in the ELA classroom! I've learned that if I don't have a plan for where students will put their papers and when these papers will become obsolete, folders quickly fill up with extraneous pages. No one can find anything!

For easy classroom organization, I provide my students with a one-inch binder. This binder becomes a place to store ongoing ELA work as well as to keep texts and resources. However, this hasn't always worked perfectly. Despite my exhortations to "Clip papers at the back of your binders!", sometimes papers just don't end up where I had intended.

For the past two years, I've been planning to create a Reading and Writing Handbook--a one-stop shop of resource pages for students to keep at the front of their binders. After months of planning and thinking, I finally put together 30 pages of my favorite resources for students!

My goal is to be able to say, "Let's turn to page___" and discuss whatever is on that page. Sometimes the pages will be for instruction; sometimes I'll just put the page number on the board as a reference. If your students are like mine, they probably ask again and again for the definition of theme. Now I can just say, "Remember, if you'd like to review what theme means, turn to page 13 in your Reading and Writing Handbook."

I'm really excited to try out this handbook and see how it works in the classroom! If you have any questions or would like to see a resource added, please let me know. I'd love to hear what works and what is needed in other schools.


Monday, August 5, 2019

Classroom Jobs for Sixth Grade

      When I first moved from middle school to elementary school, I debated whether or not to have classroom jobs. Aren't assigned jobs a little too childish for sixth graders? Would they roll their eyes at the very idea?
      I quickly learned two important lessons:

  • Sixth graders enjoy having jobs, and
  • Classroom work has to get done!

     But what jobs to have? And how to select them? Over the years, I've asked myself this question again and again, finally settling on a pretty easy and manageable system that requires very little of my input through the year.

The job chart

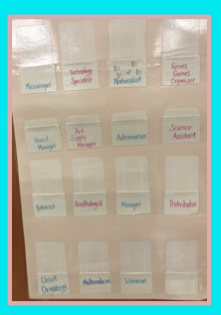
I used library pockets on a big piece of poster board. Students write their names on the top of an index card, and then I or someone else chooses cards at random and students place their cards in the pocket of their choice.

I have enough jobs for half the class. If I have too many jobs, then there are too many jobs that simply just don't have enough to do. With student input, we also double up on some jobs as we see fit.

Messenger: Takes the attendance folder in the morning, runs other errands as necessary
Technology Specialist: Moves the mobile lab in and out as needed, hands out and collects computers
Naturalist: Depending on what animals we have in the classroom, this person feeds the fish and handles other animal care
Recess Games Organizer: This person manages recess equipment for indoor and outdoor recess
Pencil Manager: Makes sure that there are sharpened pencils available and handles pencil sharpener care
Art Supply Manager: Hands out and organizes art supplies like colored pencils and markers
Astronomer: Changes the moon phase posters
Science Assistant: Helps with whatever science experiments are going on in a given week
Botanist: Waters the plants
Ornithologist: Refills the birdfeeders and makes sure that bird data is being kept
Manager: Makes sure that everyone is doing their jobs! The manager also substitutes for other jobs if students are absent
Distributor: Hands out papers
Closet Organizer: Student belongings are kept in a closets that quickly get messy! The closet organizer checks the closets and makes sure that things are kept neat
Mathematician: We find that we have many math tasks, including adding minutes for Preferred Activity Time, charting temperature data, and making a Calendar Math Schedule
Librarian: Puts up book displays, manages the book sign out binder

Be sure to leave an empty pocket or two to add jobs as needed!

Changing Jobs


I like to change jobs every week. Usually, we end up with Wednesday or Thursday as the rotation day. Because I pair this with my classroom economy, students get a salary for completing a job. (Last year I made the salary be $100, but this led to ridiculous inflation. I'm thinking I'll start at $25 this year.) The manager hands out the salaries by taking the index cards from the pockets to use as a reference. While this is happening, someone else is handing out the cards for the half of the class that hadn't had a class that week.

I have experimented with job applications, but I've found that they take too much time when I'm trying to run the classroom jobs in the background of our other classroom activities.

Besides, with an open job policy, students can try out all kinds of different jobs. Do students gravitate to certain favorites? Of course! However, by handing out the cards randomly, I try to control for this.

Class Culture


The jobs chart becomes an integral part of who we are as a class. One student, trying to read the chart from across the room, misread "Distributor" as "Disruptor". He thought it was hilarious that I would have Disruptor as a job! From then on, when students spoke out of turn everyone always chided them, "It's not your turn to be the Disruptor this week."

The job chart is also a chance for vocabulary building. It takes time for students to sort out Botanist vs. Ornithologist, but these are great real-world experiences for them.

Are there times when students don't do their assigned jobs? Yes, it happens. The Manager usually does a good job of reminding people what to do.

I find that this method of managing jobs leaves plenty of room for students to take over the system and turn it into their own. Some years they do, and the jobs morph into something amazing. Some years they don't, which is fine as well...every class is different.

What jobs do you have in your classrooms?

Monday, July 22, 2019

Reading Comprehension: The Qualitative Reading Assessment

If you're looking for a quick and easy reading assessment that yields a great deal of information, you can't go wrong with the QRI. Short for the Qualitative Reading Assessment, this assessment is my go-to for start of year assessment.

Because this is a commonly used text for professional classes, it's easy to pick up a used one for an affordable price. I'm still using the 5th Edition, although there is a more recent one available.


Because you get a spiral book, there is a bit of test set up required. However, it's all easy to manage with a school copy machine and some basic supplies.

The QRI consists of two parts: Word Lists and Comprehension Passages.

Word Lists

My co-teacher and I administer the word lists as soon as possible in the first few days of school. Like many other reading tests, students move through sets of words that get more and more difficult. For students with known past reading problems, I start at the Pre-Primer or Primer level. For students who are likely to be on grade level, I start at Level 2 or 3. Each list has 20 words, and I usually stop when students fall below a 14/20 or seem to be getting frustrated. Because I teach sixth grade, I rarely go past the Upper Middle School list.

As you can see in the photo, I give kids a copy of the words on the a word ring. Copied onto cardstock, the word lists are durable and last for years. I used a clipboard to lean on. If the weather is nice, we go outside! (Other students are doing independent reading during this time.)

After I've heard students read, I always give a bit of positive feedback about what I heard. "I liked hearing how you tried some tricky words," or "It was fun to hear you read a word list with
expression!"

I can learn so much from hearing kids read lists of words aloud! I do write down missed attempts at word solving because these attempts help me to see patterns of decoding and figure out the best ways to help students.

Because it's so early in the year, I keep the entire interaction upbeat, fun, and most of all, brief. We get through the word lists within 3 days.

Comprehension Passages

I've learned to really like the comprehension passages from the QRI. There are multiple options for each grade level labeled as narrative and expository, giving me a wide range of options from which to choose.

Where do I start students? Because I'm doing the QRI for my own purposes, I get to decide! My co-teacher and I usually look at the students' word list results and go with the student's instructional level. However, this is not a hard and fast rule. For a shy or timid student, we might choose a text at an independent level to build the child's confidence. I know that I can always go and pull another passage if I need to.

I keep passage copies in a file box and add more copies as needed. (This is a great copying task for a volunteer or a substitute!) Because I've switched grade levels a bit, my file box is a mish-mash of recycled folders. Oh well.

Each comprehension passage includes 6-8 comprehension questions, sorted as literal and inferential. I do a timed reading, prefacing it by saying, "I will have the timer going, but I'm much more interested in hearing your expression and your word-solving than in seeing how fast you can go." (I hate it when I go to listen to a student read and they take a big gulp of air before starting. That's so not the point!)

The QRI includes a retelling section. I'm often tempted to skip it, because it does take some time, but it's a useful tool to help students think about how much they remember from a selection. Also...well, as the author of a book called Summarizing, Paraphrasing, and Retelling, I feel that I shouldn't skip a retelling task!

My favorite part of the QRI is that I write down the student's answers, which means that I'm getting a clear picture of the student's reading and not their writing.

I also like to see the breakdown of student scores on inferential vs. literal questions. A student who does well on one but not the other will need some different instruction than a student who misses questions equally from both areas.

Sometimes a first assessment doesn't answer our questions about a student's reading. In this case, my co-teacher and I will often move up or down.

All in all, the QRI is my favorite start of year reading assessment! What's yours?

Sunday, April 14, 2019

ELA Test Prep: Picture Book Literature Circles

The week before state testing has a strange tension in the air. Students know that something different is coming, but aren't sure how to express their worry. Teachers fret by the copier, making packets of test prep and trying to figure out which standards haven't been covered.

This year I decided to take a different pathway. I knew that I wanted to review literary elements with students, especially theme. But what materials to use? On the one hand, I have years worth of state testing samplers. Some of them aren't terrible. On the other hand...I didn't become a teacher to use state testing samplers, if you know what I mean.

What about picture books? We have a lovely book room with lots of complex picture books. This book room has been rather quiet since our district adopted a reading series. I decided to gather some of my favorites and let the students pick which ones they'd like to read.

To add some accountability, I used a version of my literature circle materials for students to complete independently.

The results astonished me! Kids showed tremendous enthusiasm for their self-selected books. They sat and read together, working diligently on their packets and talking about their opinions. "Is there a way that we could figure out the specific year for the setting of The Memory Coat?" one group asked. In another group, the topic of whether Weslandia was a fantasy or realistic fiction led to a spirited discussion."Obviously it's fantasy, because he'd need a building permit for all of those structures. Especially in that neighborhood," said one civic-minded student.

Listening in on the students' conversations allowed me to provided just-in-time reteaching and reviewing. I was asked to explain again the difference between point of view in a narrative text and point of view in an expository text. "What's that word that starts with a c, that means how people feel about a word?" another student asked. (Connotation!) Another group had totally missed the details that lead to realizing that Nim and the War Effort takes place during World War 2, so I used the pictures and the text to demonstrate.

I also wanted to review the process of finding theme. This is so important for standardized testing, and so difficult for students to grasp. Students have used their Common Themes list all year long, but
I wanted them to revisit the different themes and practice supporting a theme with details from the text. So I showed them to how to make a Theme Graphic organizer, modeled writing a paragraph to express the theme of a story, and directed them to work with their groups to select a theme, find text evidence, and write a paragraph to support the theme.

It was amazing! The conversations were rich and complex, and students really went back to the text to find support. As a teacher, I could not have asked for anything more. We spent our last few days of instruction before tests doing real reading work that everyone loved.

As you think about last minute test preparation, consider using picture books! Not only will you find students engaged with rich stories, but you will also have the chance to hear student conversations and support students at the moment of need.


Sunday, April 7, 2019

Build STEM Enthusiasm with a Microscope Center

Spring is a fantastic time to add a microscope center to your classroom. For students in grades 3-8,
microscopes are a gateway to science: awesome, amazing, and irresistible.

Spring brings vernal pools, which are home to a great diversity of small creatures. These tiny animals can be spotted with the naked eye, but come into greater focus with the microscope.

You don't need to be an expert in microscopy to help students discover amazing tiny creatures. (I'm certainly no expert!) All you need are microscopes, a safe place to put them, and the flexibility to let kids explore.


What You'll Need


In my classroom, I use a counter area for my microscope center. If you are using microscopes that plug in, you will want to make sure that you have safe access to an outlet with no dangling cords. (Trust me: Kids will trip over any cords that you leave lying about!)

Brock Magiscopes, if you can find them, are the best tool for informal classroom investigations. They focus easily and are quite rugged, making them perfect for younger students. Magiscopes don't need an outlet, either, although a nearby light source improves images. You can see in the photo that I've covered the slight depression of the magiscope stage with a piece of transparency film. This is important when working with water samples because kids will manage to spill everywhere.

Plastic slides are helpful, especially if you can get these with wells. If you don't have slides, you can always use old transparency film that you've trimmed to size, or even the cut bottom of a clear plastic cup.

  Plastic pipettes  help students to transfer water and get small samples. I'm still using the pack of 100 that I purchased 8 years ago!

Some plastic petri dishes can also be helpful for isolating small creatures. Again, I'm still using what I bought years and years ago.


I love "A Guide to Microlife" by Kenneth Rainis, but it's getting harder to find. Don't worry, though; there are plenty of online resources to the creatures that you might locate.

Setting Up

My center can accommodate 3 students at a time. I have 3 microscopes, 2 plastic petri dishes, and 2 droppers.

I've found that using cover plates leads to more mess for my students.

It's important to limit the materials at the center! If you have too many supplies out, kids will use them with abandon. Especially the droppers.

Depending on where you have placed your microscope center, you may want to use masking tape to mark a location in which all materials must be kept. A dry erase board with rules and reminders helps to keep everyone on task.

Most importantly: Have a notebook in which students can record their observations.

Obtaining Samples

Vernal pools are amazing for water samples. A vernal pool is a water source that is only wet during the spring. I always manage to find more creatures in vernal pool samples than in any pond samples.

I live in a rural area, so it's easy to find vernal pools where I can legally take samples. Be sure to get permission wherever you choose to go! Students and other faculty members can be good resources for obtaining samples as well.

I usually get samples in a Tupperware container or mason jar. Standing at the edge of the pool, I let water enter the jar and scoop in a few leaves as well. Once the water settles, I observe the container closely. If I see a few things that look like tiny dots darting through the water, I know that I have a good sample.


If you are getting samples in March or April, when the weather is still cool, you probably won't have to worry about accidentally getting some mosquito larva. At other times of the year, make sure that you don't have wigglers in your sample. They're easy to spot, but would probably lead to some classroom issues....

Introducing the Center

If you have a document camera with zooming capabilities, you can show students some of what is in the sample by displaying it on the projector. I have found that showing the pond water with very little commentary leads to great questions from students: What's that? Where did you find it? Can I see it? Once these questions come out, I introduce the microscope center and briefly outline rules.

For the first sessions, I find some creatures and get them in the microscopes for students to see. Once I've done this, students quickly catch on! When the class has work time, I add the microscope center to the list of allowable activities. I also have a five-minute timer going to make sure that everyone gets equal access.

I also have students put sketches of what they see into their own interactive notebooks. These sketches serve as models for what students will put into the class book of observations.

Putting a single student in charge of making sure that the materials are cleaned up and samples returned at the end of each class is very important. This year, the student in charge takes great pride in making sure that everything is well taken care of.

What will you find? Every year is a little different! Most vernal pools have copepods, which can be seen with the naked eye but come into great detail with the microscopes. This year's samples have a surprising number of daphnia, and students even saw some eggs hatching! We've found that this resource from the Pennsylvania Natural Heritage Program has great information about the invertebrates we see.

Personalized Learning

At first, I make sure that everyone gets a chance to try out the microscopes. As the novelty wears off, a few students continue to check out the water. Some like playing with the droppers. (I think that water play is extraordinarily important and underutilized for students.) Others really like finding new creatures. This week, I've heard, "Mrs. Kissner, I've found a new bug!" at least ten times.

The term "personalized learning" is often used to apply to tedious websites with structured sets of activities. But I think it applies to a microscope center as well! How amazing is it for students who find this engaging to be able to have access to water and microscopes on a daily basis? 


Saturday, March 16, 2019

Take your class to read outdoors


     Did anyone else have such a beautiful Friday as we did in Pennsylvania? By March standards, it was the perfect day: windswept blue skies, bright sun, and warm temperatures.
     After lunch, a student said, "Maybe we can go read outside after we finish our spelling test." I glanced at the clock and made a doubtful face. I hadn't planned reading outside, mostly because it had been five months since our last session and I didn't think we'd have time to run down the expectations again.
     Still, we finished our assessment quickly and the students looked at me with such hope in their eyes that I gave in. "We'll try some outdoor reading," I said. It was Friday, and I didn't really expect much reading to happen. However, with colder weather on the way, I thought giving kids more time outside was the nice thing to do.
     To my surprise, students remembered every detail of our September reading sessions. They pulled Popsicle sticks to assign the cushions, found my bag of blankets, and grabbed their books. When we got outside they chose spots without delay. Five minutes after making the decision to go outside, suddenly everyone was reading in the March sunshine. They had remembered everything!

Getting ready to read outdoors

     I admit that I have an exceptional location for outdoor reading. I mean, this view is amazing, right? (Don't be too jealous; we don't have air conditioning and I'm a good half hour from the nearest Target, so there are trade-offs.)
     I'm sad to admit that for the first ten years of teaching here, I didn't really think of reading as an outdoor activity. I took students outside for science walks, and perhaps we read once or twice a season as a special activity, but it wasn't part of my consistent instruction.
     Then I moved to the end of the hall. I had an entrance twenty feet from my door. Could we read outside more often? I started to dismiss the idea. Students wouldn't want to sit on the hard ground, they wouldn't stay focused, there would be too many complications. But the pull of the outdoors was strong enough to overcome these issues. So I did some prep work to get everything ready. Here's what to do!

Collect blankets and sheets: I pulled together a collection of old blankets and sheets from my house. You know, the character twin sheets that the kids don't want to use anymore, the blankets that just feel weird, the beach towels that are frayed on the edges. I was able to pretty quickly get about 12 together, enough for my entire class. Alternatively, you could ask students to bring in beach towels or see if any parents have some to donate.
Get some old patio cushions: I didn't plan for these, but someone was upgrading their patio furniture and offered me the old and faded cushions. They are perfect for outdoor reading!
Check school procedures: When I take students outside, I always email the school secretary first and take the walkie talkie from my hallway. Be sure to find out what your school's procedures are.
Check schedules and locations: The last thing you want is to have a PE class walking through your reading session. Think about the school sessions and find a location where you won't be disturbed. You'll also want to think about how big of an area you want to control. Spreading out the students can be great, but can also make it harder to see what students are doing.
Consider the sun: Depending on the time of day, bright sunlight can make reading uncomfortable. It helps to find a location that is part sun/part shade so that students can choose what is best for them.
Grass will be wet in the morning: If you want to read first thing in the morning, the grass will be wet and will soak through your blankets and sheets. Trust me. We know. You will want some flannel-backed vinyl tablecloths instead of blankets if you are reading first thing, OR you will want to be sure to read on blacktop. As you can tell from the pictures, my reading locations vary slightly depending on the time of day and outdoor conditions.

Setting up expectations

     I like to create a looks like/sounds like chart with students before our first outdoor reading session. We talk about how reading outdoors can be a fun and relaxing activity for us. But what would a class of engaged readers look like? What would it sound like? We talked about how there would be things outdoors that we may want to look at--an overhead vulture, for example--and how we could switch our attention back and forth between what interests us and our books.
     For the first few sessions, I had my co-teacher watch the class for a few minutes while I slipped outside to arrange the blankets. I set them a good distance apart so that students can spread out. After I do this a few times, students pick up on the expectations and can arrange everything on their own. (Funny story: When we went outside on Friday for the first time in months, students fished their favorite blankets and sheets out of my bag as if they were long lost friends!) The cushions are given out by picking Popsicle sticks.
     I also made sure to take some high-interest picture books outside for the first few sessions. In August and September, students are still settling into the reading routine, and one or two will inevitably finish their books during an outdoor reading session. Having some books on hand makes it easy to get those kids right back into a book.

Managing behavior

     I never have any behavior issues outdoors! It always goes perfectly!
     Hahahahahahahahahahaha. Working with sixth graders is never dull, that's for sure. Some issues are bound to occur! For this reason, I don't generally get a chance to read myself when we are outside. Instead, I circulate to check in on what students are doing.

Kids talking instead of reading: This is by far the most common issue. Sometimes the talking is related to the novelty of being outside. I've found that talking peaks around our third outdoor reading session. After I strategically separate certain groups for a session or two, students get the message that this is important reading time.
Bug freak-outs: Some students are more concerned about this than others. We talk about how to handle bugs and have a few volunteers who will handle spider removal if necessary. If there's a student who really really doesn't want to sit on the ground, talk with them to brainstorm a solution. One year I had a student who would carry a stool out with him. It worked!
Daydreaming: I'm not sure of how big of an issue this is. Sometimes students will be outside and will just look into the mountains or sky instead of reading. I keep an eye on this and alternate indoor with outdoor reading to make sure that some reading gets done. But then...with a view like ours, who can begrudge some moments to enjoy? 

Delighting in the teachable moment

     Spending time outside always brings unexpected delights, like the bald eagle flying overhead or the robber fly stopping by. In October, when the insects are sluggish and easy to catch, we usually bring a collection container with us when we read outside to catch our six-legged friends.
     I usually take two minutes before we go inside to share what's new and interesting that day.  If students don't know what's there, they won't miss it when it's gone. On Friday, the killdeers had returned, so we spent a few moments listening for them.


   Outdoor reading time is a way to combine two wonderful activities for students. It's surprisingly easy to manage, and students find it enjoyable. Give it a try!

Wednesday, March 6, 2019

Teaching Grammar: A Content-Rich Approach


The teaching of grammar has always been fraught with peril. Since I started teaching in 1997, the general consensus seems to have been this: "Whatever you're doing, you're doing it wrong." Using worksheets? That's inauthentic and useless. Teaching parts of speech? That's not going to help student writing. Skipping grammar to add more writing? That's not going to get you good standardized test scores!
    There are some valid concerns with traditional grammar instruction. When students see isolated sentences with trivial content, their awareness slides right over what we are trying to teach. What students can get correct on a worksheet does not always transfer into their writing. And grammar instruction can seem painful and boring to both teachers and students.
    However, an awareness of grammar is vital! In order to make stylistic choices in their writing, students need to be able to recognize what words they're using and why. In order to identify aspects of writer's craft, students need to know how words are used.
    But what are the best ways to teach grammar? Wouldn't it be great if we could just conference with every child about key concepts that they need to use in their writing? However, with a class of 25-30 and a finite lifespan, I've learned that I can't address everything through a writing conference. There are definitely times when a whole-group lesson is the most efficient and helpful approach. And there are times when worksheets (the right ones!) work. To this end, I've developed an approach to grammar that I can live with and enjoy: a content-rich approach.


What Is A Content-Rich Approach?

    Kids need to know things. They need to know some of the language of formal grammar, but they also need to know about our world as a whole. What if I could make grammar instruction that combines both? Enter my content-rich approach to grammar. No more isolated sentences. Instead, grammar examples carry meaning and build up to a deeper understanding of the world around us.
    For example, recently I was teaching about appositives. (I love appositives! They are one of the best grammar concepts to teach!) As I prepared my examples, I used photographs and sentences about reptiles and amphibians. Not only do these examples grab students' attention, but they also show how the grammar concept can be applied in real writing situations.
     In worksheets, too, we can create examples that carry meaning. After students learned about appositives, they practiced identifying and punctuating appositives with sentences about sea turtles. These sentences led to further research and questions from students, who extended the grammar lesson into their own inquiry. 

Preparing Examples

     What content to choose for grammar examples? I like to explore topics that fit in with the typical curriculum, but go a step beyond. For example, when my husband asked me for some third-grade level adjective work, I used the cloud forest as a theme. His students had read a story about the quetzal in their literature anthologies, and grammar activities had the potential to extend their understanding. (Plus, it was fun for me to research and write about.)
     Sometimes there are topics that fit in well with a particular grammar concept. When I was working with possessives, I knew that birds would make the perfect topic. Not only could there be sentences about bird's beaks, but I could also use the irregular plural noun geese to show a particular case of the plural possessive!
     Content and grammar are of course tied together, and seeing multiple examples related to the same topic helps to create a solid foundation on which to build grammatical learning. The same students who don't remember the words plural possessive perk up when I say, "Remember? What we did when we were reading about the Appalachian Trail?"

Try It Out

   Here are some of the grammar units that I've been working on this year.


Saturday, February 16, 2019

How to craft a text-dependent analysis prompt

   
 Text-dependent analysis essays! From the moment that I first saw these forms of writing on our state tests I have both dreaded and admired them. On the positive side, text-dependent analysis essays inspire students to analyze texts and think more deeply. On the negative side, sometimes I feel like these essays have eaten all other forms of writing in Pennsylvania. 

    However I'm feeling today, these are tough forms of writing for students to undertake. This year, I've tried to focus more on creating a classroom that builds the deep thinking needed to analyze texts. This means that I need to create plenty of text-dependent analysis questions based on the texts that we are reading.

    Some may try to mystify the process to make it look like creating your own questions is beyond the capability of an ordinary classroom teacher. But don't believe it! With a little bit of thinking and the right kind of knowledge, you can create your own text-dependent analysis questions.


One text or several?

     This is the first question to answer for yourself. Do you want students to analyze elements within one text, or analyze connections between texts? 
     It may seem as if working with one text is easier. From a writing standpoint, using a single text will make transitions easier. However, from an analysis standpoint, sometimes it's easier for students to work with two very different texts. It's been my experience that readers will generate ideas more readily and have stronger conversations when working with multiple texts.

Choose strong texts

     Whether you are working with one text or two, be sure to use strong texts with lots to analyze. (This is one of my issues with the endless weekly assessments in the Wonders program: they are all focused on staff-written short texts that meet a certain word count and Lexile criteria, and don't offer much variety or depth.)


Two elements

     This is the key to writing a strong analysis prompt! PSSA text-dependent analysis guides state that the tested questions will always have two textual elements for students to link together. Sometimes these textual elements will be stated; sometimes they will be unstated. (Oh, joy!)
     Here are some guidelines for starting your own questions. Not every question works for every text, of course. It's best to read the text you want to use and think, "What would be fun to talk about?" This isn't meant to be an exhaustive list, of course, but a set of ideas to get you thinking.

Narrative element starters


  • Analyze how the events of the plot reveal the theme.
  • Analyze how the character's actions convey the character's traits.
  • Explain how the use of figurative language enhances the reader's understanding of the imagery.
  • Analyze how the use of stage directions impact the reader's understanding of the events.
  • Analyze how the character's actions impact the unfolding of the plot.
  • Explain how the author's choice of setting affects the events of the plot.
  • Analyze how the narration of the story would be different if the story were told from a different point of view.
  • Explain how the word choice creates a mood within the reader.


Expository element starters


  • Analyze how the text structure conveys the main ideas of the selection.
  • Explain how the author's word choice shows the author's point of view toward the topic.
  • Analyze how the text features help readers to understand the main ideas.
  • Analyze how the inclusion of firsthand accounts affects the reader's understanding of the main ideas of the text.


Talk time

     After I create a few analysis prompts for my students, I copy them and have students meet in small groups to discuss them. "You don't have to write an analysis essay," I tell them. "Instead, I want you to take great notes: write down text evidence, make connections, show your thinking!"
     Over the course of the year, I've seen an improvement in students' willingness to grapple with these conversations. It's hard! As I listen in, I've noticed that some groups focus on just one of the elements and forget to make the connection to the other one. I ask a few questions of these groups to get them thinking and help them to see how to make connections. 
     Taking the time to write these questions and elicit these conversations is well worth the effort! What prompts have you found helpful in your classroom?

For some text-dependent analysis prompts, try this resource:


Thursday, February 7, 2019

Introducing a Poetry Unit


This week I started teaching my poetry unit, which is both exciting and scary! It's exciting because I love poetry, and I love the chance to immerse my students in poems. It's scary because each year is so different from the last and I never know how students will react.

Prepare or find a poetry collection

To immerse students in poems, it's good to have a collection of poetry that they can refer back to, again and again. I have one put together in Figurative Language PowerPoint and Activities. This year, I added two sonnets (available here) to my existing collection.

Putting together a poetry collection can be as simple as gathering poems that you want to teach! By adding poems with similar themes, you can invite natural comparisons. Some of my favorites that are in the public domain include:
-The Wind, Robert Louis Stevenson
-Who Has Seen the Wind? Christina Rossetti
-The Moon's the North Wind's Cookie, Vachel Lindsay
-Perhaps You'd Like to Buy a Flower? Emily Dickinson
-Where Go the Boats? Robert Louis Stevenson
-Paper Boats, Rabindranath Tagore

In addition to the poetry collection (mostly made up of public domain poems), I also have shelves full of diverse poetry, picture books that I've picked up from prowling used book sales and the reduced price sections at discount bookstores. These poems give students windows into worlds beyond.


Find out what students already know

It's important to get an idea of what experiences students are bringing with them to the poetry experience. This year, I learned about their prior experiences with a carousel activity. I made six small posters with topics:
-Famous Poets
-Figurative Language
-How I Feel About Poetry
-Poems I Know
-Speaker in Poetry
-Poetic Structure

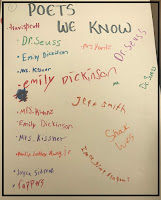
Then, students moved from poster to poster in small groups. Let me tell you, I learned so much from watching students and listening to their conversations! From the "Figurative Language" poster I observed that students can generate names of some kinds of figurative language, but that there is some confusion between figurative language and other literary devices. From the "Poets We Know" poster I saw that students couldn't really generate a list of poets, but that my name was on there. :)

Use visuals

Animated and illustrated versions of poems are so engaging! On the first day, we looked at "Ozymandias" and watched this amazing version.


Then we talked about what the poem might mean. First conversations with big poems need to be open and nonthreatening, focused less on getting right answers and more on talking about what big ideas might be lurking beneath the words. Don't worry if you don't know what meanings are lurking beneath the words! It can be a joint voyage of discovery.

On a less dramatic note, I also shared this poem that I read aloud. We talked about how the poem makes us feel calm and peaceful...a great entry into deeper discussions of tone and mood.


Give students the words to discuss

Great conversations need lots of words! This Poetry Help Sheet (available in Comparing Texts 2) is a quick and easy tool for students to use to have discussions. As an end to our second day of poetry,
students read the help sheet and used words from the page to talk about one of the poems in their collection. What is so important is that students are in control of choosing the poems and deciding how to talk about them.

Of course students had questions about these words and topics, which led to even more interesting conversations...for example, what does whimsical mean, anyway?

First experiences with poetry can make all the difference in whether students enjoy poems or look at poetry as a chore. By making your first lessons open-ended and engaging, you can help students love poetry!


Saturday, February 2, 2019

Paper Airplanes and STEM: Getting Started

   
 Looking for a fun lesson set that incorporates STEM, writing, reading, and data collection? Try a paper airplane challenge! I'm on my third iteration of this project, and each time it just gets better and better. It's a perfect way to get rid of the winter blues and do something fun and filled with learning.

The challenge

     This year, I set up the challenge like this: Aeronautics216 is looking for a paper gliders that can travel 15 meters indoors AND outdoors. Teams are asked to submit three airplanes for testing.
     ...that's it. I don't even set up a huge competition or offer a prize, because the actual activity is so engaging and awesome that it doesn't need anything else to prop it up.

Groups and Budget

     I used a Google form to get input from students as I set up the groups, assigning students to be lead engineer, graphic designer, writer, accountant, and materials manager. Groups of 4 and 5 work best, especially at a time of year when absences are frequent. If two people are missing from a group of 5 the remaining stude
nts can get on with the work. Two missing from a group of 3 leaves a pretty lonely student!
    In my first two attempts at this project, I wanted groups to have plenty of money. This time, their margins are pretty slim. I also used actual bills this time instead of just paper accounts by printing out $100 and $500 bills from Classroom Economy.
     Students may use as much recycled paper as they want for prototypes, but they must purchase the paper for submission planes at the price of $500/sheet. They also have to pay for extra testing sessions, marker rental, storage, and so forth. You can find the complete budget here.
     Most students don't realize at first just how far 15 meters is. They read it as "15 feet" and it only slowly dawns on them that the task is a lot harder than they thought.

Flight Rules

     An important rule that keeps this from devolving into chaos: Planes can't be tested at school until the official testing day.
     I had to fine groups $200 for breaking this rule on the first day, and it was remarkably effective. Since that initial problem, I've had no issues.
     Kids ask, "Can we take them home and test them there?" What they're really asking, of course, is "Can I do extra homework?" But I don't tell them this, and I say reluctantly that sure, if their parents are okay with it, they can make and test planes at home.

Working in groups

     In the first two sessions, students work pretty intensively on creating group names, logos, and airplane prototypes. Everyone knows how to build the standard airplane, but those are unlikely to fly 15 meters. So students use the sets of directions that I have available to try to build other versions.
     I make the video directions more costly than the printed directions because I want students to feel that struggle of reading procedural text. Airplane directions are a great equalizer, because some students who are great readers have trouble with the folding, while other students who may struggle with reading find the layout and structure of airplane directions to be a piece of cake.
     You can find plenty of paper airplane directions online, although the best source that we've found is the Klutz Paper Airplane Book.
     When there are issues in groups, I offer my (paid) services as mediator. I also give ratings sheets so that group members may rate each other on cooperation and responsibility. Once this happens, groups tend to pull together. (I admit that dealing with the inner workings of groups is my least favorite part of this activity, and that I treat it as my own area for personal growth!)

Initial testing

     Before the first testing session, groups need to make their own data collection sheets. Most of my students haven't made tables before, so I showed them this video from GCF LearnFree about creating tables in Google Docs. (Why tables instead of spreadsheets? Students are handwriting information into printed sheets, so I thought the table would give them more options.)
     I had two students who were finished with other tasks set up our testing zone in the hallway by marking out meters with masking tape. Two groups tested at a time, following a strict protocol that meant that the hallway was clear before airplanes flew. Groups had 6 minutes for testing, which seems like a short time but was adequate if they got straight to work and didn't play around.
     I recommended that groups have at least 5 planes for testing, but of course some groups did not. That's part of the process! Most of the planes went only 5-6 meters. The best performing plane went 13 meters.
     Looks like the groups will have to do some rethinking when we return to school next week! I'm hoping that they think to ask the group with the farthest flying airplane which model they used (the Hammer) and build more prototypes along those lines.

Looking forward

     In the week to come, I'll collect the data from initial testing so that we can practice finding landmarks of data like mean, median, range, and mode. This will help students to contextualize their results. Students will be busy building for their second round of testing!

Tuesday, January 29, 2019

What to do with a classroom bird feeder


Choosing Feeders

    For the widest variety of birds, think about your levels. Some birds like to eat from the ground, others from hanging feeders, others from suet, and still others from elevated trays. Of course, your classroom location will determine which birds visit your feeder. When I was on the playground side of my school I was visited by very different birds than we see on the forest side.
    I decided to start small with the free feeder from BirdSleuth (offered occasionally). Over the past five years, I've added more and more! It's important to choose something that is easy to clean, inexpensive, and sturdy.
     Trays: A plastic tray is a great starting point because it's easy to clean and easy to replace. Because I have a heating unit right outside my window, I have the perfect spot to place a tray of sunflower seeds. (I buy the 40 lb. bags at Tractor Supply, which last about 2 months for $20)
     My students love the juncos, cardinals, chickadees, and finches that come to the tray. We sometimes put out unsalted peanuts, which attracts my class's favorite: the blue jay.
     Tube feeders: These are cheap and attract a nice variety of finches. Last year, though, we had record rainfall, and I did find that mold sometimes grew in the nyjer seed.
     Suet feeders: Suet is inexpensive and attracts woodpeckers and nuthatches, which are fun to watch. If you are not near a forest, you may find that starlings come to get your suet, which is also interesting.
     Peanut butter: In the years that I don't have any students with allergies, I purchase peanut butter to put outside as well. You can see the feeder in the photo above, but honestly it's easy enough to just smear peanut butter on some branches or put it on some wired pine cones. The Carolina wrens love it! Plus, it's way cheaper than many other kinds of seed.
     Feeder cam: No place for a feeder? No problem! The Ontario FeederWatch and the Cornell Birds Feeder are great to display for students.
    Feeder cleaning: Whatever kind of feeder you use, be sure to clean it frequently so that you are not inadvertently spreading disease.

Identification

     Part of the fun of observing birds is learning their names. I like to use a classroom birds slideshow as a fun icebreaker at the start of the school year. Kids like practicing their identification skills with photos I've taken at the window. They're often amazed to find out how many different species we can see just from our classroom.
     The allaboutbirds.org site is excellent for teaching students website navigation skills. I especially appreciate that it doesn't have external ads! With these webpages, you can teach all about digital text features, navigation, and browsing. There are great nonfiction texts there for the reading as well.
     Will your students make some identifications that sound silly at first? Absolutely! It's only through practice that students learn how to find the maps to see if a bird lives in their area, how to sift through the photos of similar birds, and how to connect bird behavior to different types of birds. Be patient and make the identification process a learning experience from start to finish.

Bird Observation Journal

     Once students get to be good at identification, I get out the bird observation journal. This is a place for students to record what they are seeing at the window. Kids may get up and look out the window, one or two at a time, as long as they write down what they see.
    Each year, students decide how they'd like to organize the journal. Sometimes students prefer to go by hour, while at other points students like to just write down what they see in a more casual way.
     There are occasionally discrepancies and problems with our data, which just means...we're doing science! When there are issues (wait, that wasn't a white-crowned sparrow, it was a white-throated sparrow!), we can discuss what these mean for our data and what to do next.

Phenology

     The records in our observation journals then become data for future years! We can track when the juncos will arrive, when the white-throated sparrows will leave, and when the goldfinches will turn yellow. As I tell my students...it's all because we noticed what was there and wrote stuff down.

Closing Thoughts

     I'm not sure when the process of knowing what lives around us and following the patterns of season and sky became unworthy of teaching. When I was in fifth grade, I told my teacher that I wanted to be a naturalist when I grew up. She said, "That's not a job."
     This is the kind of thinking that has brought us here--facing a future with insect populations in collapse, monarch butterflies disappearing, once familiar birds of field and forest now rare and unseen. You can't love what you don't notice. Taking the time to help students appreciate and love what surrounds us is worth the effort.
   

Thursday, January 24, 2019

Understanding Narratives: Story Events

    Supporting all learners in a mixed ability classroom can be a daunting challenge. Over the years,
I've found that having the right materials makes a huge difference! When I'm teaching narratives, my go-to tool is a simple set of events from the story.
    These event cards are so useful! Differentiation is quick, easy, and meaningful, as event cards have so much potential for helping students to zoom in on a story and read closely.

Preparing Event Cards

    Event cards are simple to prepare. Just make a single-column table in Word and type the events from the story in order. Use the same number of lines for each cell to keep your final cards the same size. (I find that a 16-point Georgia with three lines per cell work well.) Remember that it's almost impossible to cut a single line cell!
    Depending on your students, you may want to make your events simple, or more detailed. Be sure to include a sentence to establish the setting and the characters.
    When I'm ready to use my cards, I photocopy them on some cardstock and trim the edges at the paper cutter. The kids can do the rest of the cutting! I store cards in envelopes or clear plastic bags in the hopes that I will find them again the next year. (Narrator's voice: She won't.) I never make enough for everyone in the class, because I want students to have to share! Groups of 2-3 are best to make sure that everyone gets to handle the events.

Sequencing

    At the most basic level, the event cards are great for helping students to sequence the events in a story. This week, students read a drama from our literature anthology. Putting events from the drama in order helped students to piece together the action.
    Here's where these cards are great for differentiation! It's fascinating to listen in on the conversations that students have. As they argue about which event comes before that one, they often can't resist going back to the text to prove their points.
    Groups finish this task at different times, of course, and so I always put an extension question on the board. In this case, it was: "Read through the event cards with your partner. How is this reading experience different from reading the story in the drama format?"
   

Understanding Parts of a Plot

     Event cards are also perfect for talking about how a plot unfolds. This is an important standard for sixth grade, and one that requires lots of productive conversation.
     Using event cards is so much friendlier for students than filling out a plot diagram! A mistake in ordering doesn't mean tedious erasing and rewriting--instead, it's just a simple swap of the cards. Watching my students piece together the events of a story helped me to see how their understanding of plot is developing and how they see the different pieces come together.

Character Changes

     If students are having trouble talking about how characters change over the course of a plot, event cards can be helpful tools! Events provide anchors to help students recall the sequence and understand what happens when. Sometimes students who struggle to respond verbally can hold onto an event card and explain how the character changed in response to what occurs. For students with retrieval and executive functioning issues, having manipulatives for reading can be just the scaffold they need for higher order thinking.

Have you tried story event cards? What have you noticed with your learners?


Sunday, January 20, 2019

Teaching Summarizing: If It's January, They Must Be Writing "About" Summaries

    Outside, the snow is falling, and our classroom feeder is attracting many beautiful birds. Students are learning to observe and ask questions about these birds, noticing the small differences in species and individuals.
    Inside, my co-teaching partner and I decided to do a formative assessment on expository summarizing. We used the bedbugs text from my Paraphrasing and Summarizing pack, which I like because it uses a main idea scoring tool instead of a rubric. Main idea scoring tools are a great way to quickly score many summaries without too much pain.
     We've been working on expository summarizing a little at a time over many weeks. Students have had scaffolded summaries (from this resource), modeled summaries, and main idea work. We felt confident that students would do well with this assessment.

What is an "about" summary?

     So imagine our surprise when we ended up with a pile full of "about" summaries! I really hadn't seen many of these so far this year, which made their sudden proliferation more surprising. If you're not sure of what an "about" summary looks like, take a look at the example on the right.
    "About" summaries hopscotch through a text, using chronological order transitions to show the reader's journey from topic to topic. You can see why it's called an "about" summary--the word appears over and over again. This kind of summary includes only topics and not main ideas.

What do these summaries mean?

     Over the last ten years, I've come to recognize "about" summaries as a key step on the way to summarizing skill. Notice that this kind of summary shows an awareness of the topics in a text, and the order in which they are presented. It's no surprise that these summaries often come from high-performing students. These readers are experimenting with ways to express ideas from a text in fewer words.

Next steps

     Students can't be allowed to stop at "about" summaries. This kind of thinking keeps them at the topic level, not looking for a text structure or deeper connections within a text. Here are some ideas to help students improve:
Choose the best summary tasks: After reading an expository text, have students choose from 3-4 sample summaries. Write one as an "about" summary. Then, discuss their choices. This is a great way to gently nudge students away from this style.
Text structure awareness: If students have to put information from a text into a graphic organizer that reflects the text structure of the text, then they are much more likely to write a strong summary. Help students to see that a successful summary should reflect the structure of the target text.
Continued work with summarizing: Yup, we need to keep working on it! Summarizing doesn't have to be a single week of instruction. Instead, spread it out over the course of the year so that students put summarizing and paraphrasing skills to work again and again.

News and notes

I've put up some new materials on TpT!

 Algebraic Expressions: This is a free (for now) PowerPoint that introduces algebraic expressions. I wanted some lovely pictures to enhance my math class.

I haven't made many math materials because I'm still relatively new to teaching sixth grade math (this is year 3!), but I'm looking forward to doing more.


A Look at Lightning: My husband, who teaches third grade, has been using the "Lightning Readers Theatre" script for years. This year, he asked if I could write a short text to go along with it. I added two levels of the text, plus some writing activities to make this an activity for both writing and science.


Comparing with Adjectives: This was another special request! Using the comparative and superlative forms of adjectives is so important for young writers. (I couldn't resist adding bird pictures.)