Saturday, February 16, 2019

How to craft a text-dependent analysis prompt

   
 Text-dependent analysis essays! From the moment that I first saw these forms of writing on our state tests I have both dreaded and admired them. On the positive side, text-dependent analysis essays inspire students to analyze texts and think more deeply. On the negative side, sometimes I feel like these essays have eaten all other forms of writing in Pennsylvania. 

    However I'm feeling today, these are tough forms of writing for students to undertake. This year, I've tried to focus more on creating a classroom that builds the deep thinking needed to analyze texts. This means that I need to create plenty of text-dependent analysis questions based on the texts that we are reading.

    Some may try to mystify the process to make it look like creating your own questions is beyond the capability of an ordinary classroom teacher. But don't believe it! With a little bit of thinking and the right kind of knowledge, you can create your own text-dependent analysis questions.


One text or several?

     This is the first question to answer for yourself. Do you want students to analyze elements within one text, or analyze connections between texts? 
     It may seem as if working with one text is easier. From a writing standpoint, using a single text will make transitions easier. However, from an analysis standpoint, sometimes it's easier for students to work with two very different texts. It's been my experience that readers will generate ideas more readily and have stronger conversations when working with multiple texts.

Choose strong texts

     Whether you are working with one text or two, be sure to use strong texts with lots to analyze. (This is one of my issues with the endless weekly assessments in the Wonders program: they are all focused on staff-written short texts that meet a certain word count and Lexile criteria, and don't offer much variety or depth.)


Two elements

     This is the key to writing a strong analysis prompt! PSSA text-dependent analysis guides state that the tested questions will always have two textual elements for students to link together. Sometimes these textual elements will be stated; sometimes they will be unstated. (Oh, joy!)
     Here are some guidelines for starting your own questions. Not every question works for every text, of course. It's best to read the text you want to use and think, "What would be fun to talk about?" This isn't meant to be an exhaustive list, of course, but a set of ideas to get you thinking.

Narrative element starters


  • Analyze how the events of the plot reveal the theme.
  • Analyze how the character's actions convey the character's traits.
  • Explain how the use of figurative language enhances the reader's understanding of the imagery.
  • Analyze how the use of stage directions impact the reader's understanding of the events.
  • Analyze how the character's actions impact the unfolding of the plot.
  • Explain how the author's choice of setting affects the events of the plot.
  • Analyze how the narration of the story would be different if the story were told from a different point of view.
  • Explain how the word choice creates a mood within the reader.


Expository element starters


  • Analyze how the text structure conveys the main ideas of the selection.
  • Explain how the author's word choice shows the author's point of view toward the topic.
  • Analyze how the text features help readers to understand the main ideas.
  • Analyze how the inclusion of firsthand accounts affects the reader's understanding of the main ideas of the text.


Talk time

     After I create a few analysis prompts for my students, I copy them and have students meet in small groups to discuss them. "You don't have to write an analysis essay," I tell them. "Instead, I want you to take great notes: write down text evidence, make connections, show your thinking!"
     Over the course of the year, I've seen an improvement in students' willingness to grapple with these conversations. It's hard! As I listen in, I've noticed that some groups focus on just one of the elements and forget to make the connection to the other one. I ask a few questions of these groups to get them thinking and help them to see how to make connections. 
     Taking the time to write these questions and elicit these conversations is well worth the effort! What prompts have you found helpful in your classroom?

For some text-dependent analysis prompts, try this resource:


Thursday, February 7, 2019

Introducing a Poetry Unit


This week I started teaching my poetry unit, which is both exciting and scary! It's exciting because I love poetry, and I love the chance to immerse my students in poems. It's scary because each year is so different from the last and I never know how students will react.

Prepare or find a poetry collection

To immerse students in poems, it's good to have a collection of poetry that they can refer back to, again and again. I have one put together in Figurative Language PowerPoint and Activities. This year, I added two sonnets (available here) to my existing collection.

Putting together a poetry collection can be as simple as gathering poems that you want to teach! By adding poems with similar themes, you can invite natural comparisons. Some of my favorites that are in the public domain include:
-The Wind, Robert Louis Stevenson
-Who Has Seen the Wind? Christina Rossetti
-The Moon's the North Wind's Cookie, Vachel Lindsay
-Perhaps You'd Like to Buy a Flower? Emily Dickinson
-Where Go the Boats? Robert Louis Stevenson
-Paper Boats, Rabindranath Tagore

In addition to the poetry collection (mostly made up of public domain poems), I also have shelves full of diverse poetry, picture books that I've picked up from prowling used book sales and the reduced price sections at discount bookstores. These poems give students windows into worlds beyond.


Find out what students already know

It's important to get an idea of what experiences students are bringing with them to the poetry experience. This year, I learned about their prior experiences with a carousel activity. I made six small posters with topics:
-Famous Poets
-Figurative Language
-How I Feel About Poetry
-Poems I Know
-Speaker in Poetry
-Poetic Structure

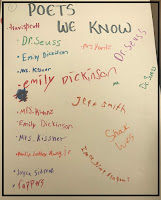
Then, students moved from poster to poster in small groups. Let me tell you, I learned so much from watching students and listening to their conversations! From the "Figurative Language" poster I observed that students can generate names of some kinds of figurative language, but that there is some confusion between figurative language and other literary devices. From the "Poets We Know" poster I saw that students couldn't really generate a list of poets, but that my name was on there. :)

Use visuals

Animated and illustrated versions of poems are so engaging! On the first day, we looked at "Ozymandias" and watched this amazing version.


Then we talked about what the poem might mean. First conversations with big poems need to be open and nonthreatening, focused less on getting right answers and more on talking about what big ideas might be lurking beneath the words. Don't worry if you don't know what meanings are lurking beneath the words! It can be a joint voyage of discovery.

On a less dramatic note, I also shared this poem that I read aloud. We talked about how the poem makes us feel calm and peaceful...a great entry into deeper discussions of tone and mood.


Give students the words to discuss

Great conversations need lots of words! This Poetry Help Sheet (available in Comparing Texts 2) is a quick and easy tool for students to use to have discussions. As an end to our second day of poetry,
students read the help sheet and used words from the page to talk about one of the poems in their collection. What is so important is that students are in control of choosing the poems and deciding how to talk about them.

Of course students had questions about these words and topics, which led to even more interesting conversations...for example, what does whimsical mean, anyway?

First experiences with poetry can make all the difference in whether students enjoy poems or look at poetry as a chore. By making your first lessons open-ended and engaging, you can help students love poetry!


Saturday, February 2, 2019

Paper Airplanes and STEM: Getting Started

   
 Looking for a fun lesson set that incorporates STEM, writing, reading, and data collection? Try a paper airplane challenge! I'm on my third iteration of this project, and each time it just gets better and better. It's a perfect way to get rid of the winter blues and do something fun and filled with learning.

The challenge

     This year, I set up the challenge like this: Aeronautics216 is looking for a paper gliders that can travel 15 meters indoors AND outdoors. Teams are asked to submit three airplanes for testing.
     ...that's it. I don't even set up a huge competition or offer a prize, because the actual activity is so engaging and awesome that it doesn't need anything else to prop it up.

Groups and Budget

     I used a Google form to get input from students as I set up the groups, assigning students to be lead engineer, graphic designer, writer, accountant, and materials manager. Groups of 4 and 5 work best, especially at a time of year when absences are frequent. If two people are missing from a group of 5 the remaining stude
nts can get on with the work. Two missing from a group of 3 leaves a pretty lonely student!
    In my first two attempts at this project, I wanted groups to have plenty of money. This time, their margins are pretty slim. I also used actual bills this time instead of just paper accounts by printing out $100 and $500 bills from Classroom Economy.
     Students may use as much recycled paper as they want for prototypes, but they must purchase the paper for submission planes at the price of $500/sheet. They also have to pay for extra testing sessions, marker rental, storage, and so forth. You can find the complete budget here.
     Most students don't realize at first just how far 15 meters is. They read it as "15 feet" and it only slowly dawns on them that the task is a lot harder than they thought.

Flight Rules

     An important rule that keeps this from devolving into chaos: Planes can't be tested at school until the official testing day.
     I had to fine groups $200 for breaking this rule on the first day, and it was remarkably effective. Since that initial problem, I've had no issues.
     Kids ask, "Can we take them home and test them there?" What they're really asking, of course, is "Can I do extra homework?" But I don't tell them this, and I say reluctantly that sure, if their parents are okay with it, they can make and test planes at home.

Working in groups

     In the first two sessions, students work pretty intensively on creating group names, logos, and airplane prototypes. Everyone knows how to build the standard airplane, but those are unlikely to fly 15 meters. So students use the sets of directions that I have available to try to build other versions.
     I make the video directions more costly than the printed directions because I want students to feel that struggle of reading procedural text. Airplane directions are a great equalizer, because some students who are great readers have trouble with the folding, while other students who may struggle with reading find the layout and structure of airplane directions to be a piece of cake.
     You can find plenty of paper airplane directions online, although the best source that we've found is the Klutz Paper Airplane Book.
     When there are issues in groups, I offer my (paid) services as mediator. I also give ratings sheets so that group members may rate each other on cooperation and responsibility. Once this happens, groups tend to pull together. (I admit that dealing with the inner workings of groups is my least favorite part of this activity, and that I treat it as my own area for personal growth!)

Initial testing

     Before the first testing session, groups need to make their own data collection sheets. Most of my students haven't made tables before, so I showed them this video from GCF LearnFree about creating tables in Google Docs. (Why tables instead of spreadsheets? Students are handwriting information into printed sheets, so I thought the table would give them more options.)
     I had two students who were finished with other tasks set up our testing zone in the hallway by marking out meters with masking tape. Two groups tested at a time, following a strict protocol that meant that the hallway was clear before airplanes flew. Groups had 6 minutes for testing, which seems like a short time but was adequate if they got straight to work and didn't play around.
     I recommended that groups have at least 5 planes for testing, but of course some groups did not. That's part of the process! Most of the planes went only 5-6 meters. The best performing plane went 13 meters.
     Looks like the groups will have to do some rethinking when we return to school next week! I'm hoping that they think to ask the group with the farthest flying airplane which model they used (the Hammer) and build more prototypes along those lines.

Looking forward

     In the week to come, I'll collect the data from initial testing so that we can practice finding landmarks of data like mean, median, range, and mode. This will help students to contextualize their results. Students will be busy building for their second round of testing!